In the previous posts, we covered the basics: what RAG is, why it matters for journalism, and how a typical pipeline works. In the next three parts, we’ll move from concepts to code and show how a RAG bot is put together.
As outlined in the previous post, when we implemented our pipeline, we followed seven steps:
(1) Define the use case.
(2) Index the knowledge base.
(3) Build a test set.
(4) Define metrics.
(5) Build a naïve baseline.
(6) Extend to an advanced pipeline.
(7) Test, compare, iterate.
In this fourth post, we’ll tackle the first four steps.
To keep things simple and reproducible, we’ll use a small knowledge base, a small test set, and a few metrics only. You can find the full code in our public GitHub repo here.
Define the Use Case
We’ll start with a classic newsroom scenario: an archive-based chatbot, similar to the RAG tools some publishers (such as The Washington Post or Financial Times) have used. The idea is simple: scientists, science journalists, and interested readers ask questions about topics we cover at the Science Media Center, and the bot generates answers that are grounded in our own publications (i.e., our archive).
Defining the use case comes first because it drives every downstream choice: from indexing and retrieval strategy to evaluation data and metrics.
Building the Knowledge Base & Vector Store
Because the bot should rely on our archive, the knowledge base is built from those articles. For this tutorial, we’ll keep it tiny and store only a few documents as .txt files (but most other text formats will work too).
We use LangChain, an open-source framework for building applications with large language models. It automates much of the processes (such as loading the files, splitting text into chunks, creating embeddings, and performing similarity searches), so we can focus on designing and experimenting with the actual pipeline.
Basically, we only need to set three key parameters:
- Embedding model: We use OpenAI’s small embedding model, a lightweight and inexpensive model. It’s efficient enough for experimentation while still providing strong semantic representations. For production scenarios, you could try more powerful models or domain-specific embeddings.
- Chunk size & overlap: We use a chunk size of 512 characters with 20 characters overlap. This strikes a balance: chunks aren’t too large that retrieval becomes fuzzy, but not too small that coherence is lost. The overlap prevents important context from being cut at the boundaries. This setup is also in line with findings from this paper. Check it out if you’re interested in starting values and defaults to use when you’re not sure where to begin.
After setting these parameters, we can already index our documents and store them in a FAISS-backed vector store.
# load the packages
import os
from langchain_openai import OpenAIEmbeddings
from langchain.text_splitter import RecursiveCharacterTextSplitter
from langchain.schema import Document
from langchain.vectorstores import FAISS

# set parameters for vector store creation
data_path = "data/example_data" # input folder with .txt files
save_path = "data/vectorstores" # where to persist the vectorstore
embedding_model = "text-embedding-3-small"
text_chunk_size = 512
text_chunk_overlap = 20

# 1.) Read .txt files and create langchain documents for processing
documents = []
for filename in os.listdir(data_path):
    if filename.endswith('.txt'):
        file_path = os.path.join(data_path, filename)
        # load each txt file
        with open(file_path, 'r', encoding='utf-8') as f:
            content = f.read()

        # Split and extract the title
        lines = content.split('\n')
        title = lines[0].replace('TITLE: ', '').strip()

        # Get text content excluding title and empty line
        text_content = '\n'.join(lines[2:])

        # Create document with metadata
        doc = Document(
            page_content=text_content,
            metadata={'title': title}
        )
        documents.append(doc)

# 2.) Chunk the documents
text_splitter = RecursiveCharacterTextSplitter(
    chunk_size=text_chunk_size,
    chunk_overlap=text_chunk_overlap
)

text_chunks = text_splitter.split_documents(documents)

# 3.) Embed chunks and build FAISS vector store
embeddings = OpenAIEmbeddings(model=embedding_model)

vectorstore = FAISS.from_documents(
    documents=text_chunks,
    embedding=embeddings
)

# 4.) Save locally
vectorstore.save_local(save_path)
We can check whether the vector store is working by running a similarity search on an example query:
search_query = "Which medications are used to treat schizophrenia?"
results = vectorstore.similarity_search(query=search_query, k=3) # returns top 3 results
If the top results match the query well, our setup is ready to go.
To recap:
- We loaded our archive text articles into LangChain’s Document format with the corresponding metadata.
- We split them into manageable chunks with overlap to preserve context.
- We embedded those chunks using a small embedding model.
- We indexed the embeddings in a FAISS-backed vector store and saved it locally.
With this, our knowledge base has been transformed into a searchable database, ready for the next steps: creating a synthetic test set and defining evaluation metrics.
Creating a Synthetic Test Set
In the next step, we create an artificial (synthetic) test set consisting of question–answer (QA) pairs. We’ll later use this test set to compare different pipelines and see how various techniques affect performance.
In an ideal world, we would use human-authored questions and expert-curated gold answers. In reality, this approach is time-consuming, expensive, and often beyond what most organizations are capable of. As a pragmatic alternative, we rely on synthetic data, as prior work suggests that this can be effective for testing and evaluating LLM tools (e.g., see here and here).
For generating the test set, we use the synthesizer module of the DeepEval package. The evaluation and filtering steps that follow (LLM-as-a-judge prompts, scoring, normalization, and diversity checks) are implemented by our own custom functions. A particularly useful feature of DeepEval is that you can shape the style and structure of the QA pairs directly through natural language descriptions, making it easy to adapt test set for various use cases and contexts.
How the Synthesizer Works
The basic idea is straightforward:
- Again, you start with your knowledge base (i.e., your document collection).
- These documents are split into smaller chunks, analogously to the vector store creation.
- One of those chunks is chosen randomly, serving as a starting point.
- Via cosine similarity, the semantically closest chunks are identified; the chunk from the starting point plus the semantically most similar chunks are combined to create a new context.
- A query generator (basically an LLM) is used to generate QA pairs based on the newly created context.
The DeepEval package allows many knobs (how many chunks to sample per document, how to build context windows, similarity settings, thresholds, etc.). In our setup, we mostly stick to the defaults, except for the chunking parameters, which we align with the chunking strategy used for indexing the vector store to keep things comparable. We then apply our own post-filtering afterward. Click here for a deeper dive into tuning possibilities.
# load the packages
from deepeval.synthesizer import Synthesizer
from deepeval.synthesizer.config import StylingConfig, ContextConstructionConfig

# 1.) Style & task guidance (natural language controls the QA shape)
styling_config = StylingConfig(
    input_format=
        "Natural, conversational questions in German that use everyday language rather than technical terminology."
        "Questions should use paraphrases and pronouns, and occasionally contain mild irrelevant details."
        "Each question addresses exactly one scientific aspect.",
    expected_output_format=
        "Concise answers in German, clearly structured citing evidence.",
    task=
        "Answering focused scientific, non-trivial queries that address specific aspects of"
        "medical, climate, environment, or technology topics.",
    scenario=
        "Science journalists, scientists, or curious non-experts seeking precise information"
        "on a specific scientific topic they've encountered.",
)

# 2.) Choose a cheap and fast LLM for generation
synthesizer = Synthesizer(
    model="gpt-4o-mini",
    styling_config=styling_config
)

# 3.) Use the same text files we used to build the vectorstore
data_dir = "data/example_data"
story_files = glob.glob(f'{data_dir}/*.txt')

# 4.) Set the same chunking parameters as before
context_construction_config = ContextConstructionConfig(
    chunk_size=512,
    chunk_overlap=20
    )

# 5.) Generate QA pairs grounded in our knowledge base
synthesizer.generate_goldens_from_docs(
    document_paths=story_files,
    include_expected_output=True,
    context_construction_config=context_construction_config
    )
Post-Filtering the Initial Test Set
At first glance, many generated questions look pretty good (we’re primarily interested in the questions, not the gold answers). However, to improve the quality of the set and make it more realistic, we apply post-hoc filtering with LLM-as-a-judge prompts:
- Groundedness: Can the question be answered from the provided context?
- Relevance: Is the question useful for our use case (science journalism)?
- Standalone Is the question self-contained (not referencing named individuals or a specific paper, and not compound)?
(For the full prompt definitions, check out our repo.)
Each criterion is rated between 1 and 5 by a lightweight model. We then normalize and weight the scores, compute a total score, and drop the bottom N%. Importantly, we do not only keep the easiest questions. Instead, we prefer a range of difficulty so that pipeline improvements can actually show up in metrics later.
# load the prompts and packages
from data.prompts.evaluation_prompts import (
    question_groundedness_critique_prompt,
    question_relevance_critique_prompt,
    question_standalone_critique_prompt
)
from langchain import ChatAnthropic

# 1.) We use a lightweight and fast model for evaluation
evaluation_llm = ChatAnthropic(
        model_name="claude-3-5-haiku-20241022",
        temperature=0,
        max_tokens=512,
        verbose=False
    )

# 2.) Bundle the LLM-as-a-judge prompts and evaluate each synthetic question against the criteria
critique_prompts = {
    "groundedness": question_groundedness_critique_prompt,
    "relevance": question_relevance_critique_prompt,
    "standalone": question_standalone_critique_prompt
}

from src.utils.synth_data_creation import evaluate_qa_pairs
eval_qa_pairs = evaluate_qa_pairs(
    synthetic_qa_pairs_sample,
    critique_prompts,
    evaluation_llm
    )

# 3.) Score processing: normalize, weight, and filter bottom 15%
from src.utils.synth_data_creation import process_evaluation_scores
filtered_df = process_evaluation_scores(
    eval_qa_pairs,
    groundedness_weight=0.35,
    standalone_weight=0.35,
    relevance_weight=0.3,
    bottom_percent_remove=15
)
The functions `evaluate_qa_pairs` and `process_evaluation_scores` are small helpers from our repo: the first runs each QA pair through the critique prompts and captures a numeric score + brief rationale; the second normalizes and weights those scores to compute an average and removes the bottom slice (15% here). If you want to see the full details, check the source in the repo.
Diversity Matters
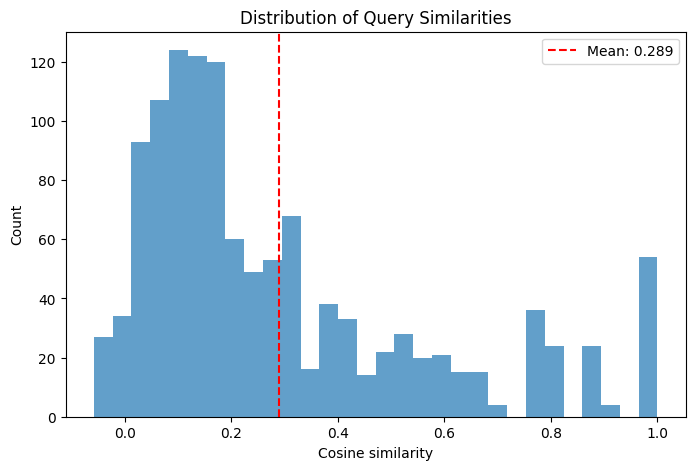
Lastly, quality alone isn’t enough. A good test set should also be diverse. A diverse test set helps prevent overfitting to a narrow topic or domain and ensures that the model is evaluated on the full breadth of real‐world examples. To check this, we compute pairwise cosine similarity between questions using a lightweight multilingual sentence transformer from HuggingFace and inspect the distribution, again, using our own helper function:
# load the function
from src.utils.synth_data_creation import analyze_semantic_similarity

# We load the sentence transformer, embed the questions, and compute pariwise cosine similarities;
# we return mean/std values and plot the histogram
sims, sim_matrix = analyze_semantic_similarity(filtered_df)
In our example, the mean pairwise similarity is 0.289, which is fine and indicates an overall diverse test set. The histogram is right-tailed: it peaks at lower similarity values (most question pairs are dissimilar) with a longer, thinner tail toward higher similarities, reflecting a few clusters of closely related questions (which is expected due to the small knowledge base).
Finally, we do a quick manual pass to remove any obviously off-topic or malformed questions. The result is a compact and diverse test set that we can generate quickly and cheaply, saving days or even weeks of manual labeling.
To recap:
- We generated a synthetic QA set from our archive using the DeepEval synthesizer module, steering style, task, and scenario in natural language.
- We kept chunking parameters consistent with our vector store to align with retrieval behavior.
- We applied LLM-as-a-judge checks for groundedness, relevance, and standalone quality, then normalized and filtered the set.
- We measured diversity via pairwise cosine similarity and did a final manual pass.
With this, we have a clean and diverse synthetic test set to use in the next step: defining evaluation metrics.
Defining Metrics
So far, we’ve defined the use case, built a vector store we can search semantically, and generated a synthetic data set to test different RAG variants. The last piece in this (admittedly long) post are the metrics.
But why do we need metrics? It’s tempting to simply trust your gut (e.g., This answer looks way better than before!). However, “vibe checks” don’t scale, especially when comparing many variants or changes. Instead of eyeballing a few answers, you explicitly define what “good” means for your use case, operationalize those needs as metrics, and then measure. That gives you a more objective signal to compare techniques and evaluate a running system.
Basically, metrics give you three big advantages:
- Transparency: use can see exactly what you optimized for.
- Comparability: you can compare two pipelines quantitatively (e.g., by showing that method A improved metric A by x%).
- Guidance: when one metric underperforms, you know where to focus (e.g., answer generation vs retrieval step vs system prompt design).
There are two different types of metrics you can use: generic metrics (predefined, quick to adopt) and custom metrics (adapted to your own needs). In our example, we’ll use the generic ones to get a baseline. However, in the following sections, you’ll also see how to add custom metrics.
Additionally, metrics themselves can be divided into LLM-as-a-judge metrics and deterministic metrics:
- LLM-as-a-judge metrics rely on a language model to judge outputs.
- Deterministic metrics are algorithmic, rule-based, or statistical and yield consistent results given the same inputs.
In the examples that follow, we show both kinds: you’ll see how to integrate LLM-as-a-judge metrics for more nuanced judgments, and also how to use deterministic metrics for objective evaluation.
We use the DeepEval package to simplify metric implementation, because it comes with a wide set of ready-to-use (generic) RAG metrics as well as a mechanism to build custom metrics (via GEval) without much coding knowledge.
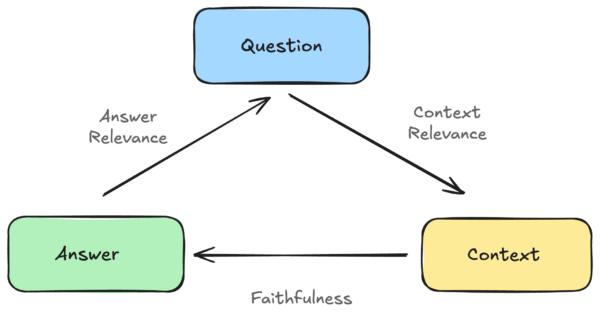
The RAG Triad
Among the generic options, we’ll use the RAG triad, a basic set of three metrics commonly applied to RAG systems. This collection consists of following metrics:
- Answer Relevance: how relevant is the generated answer to the user’s question?
- Context Relevance: how relevant is the retrieved context to the user’s question?
- Faithfulness: is the answer grounded in the retrieved context (i.e., proxy for hallucination)?
With DeepEval, you can use these metrics out of the box. They return a continuous score between 0 and 1, and you only need to provide the relevant input parameters for each metric (e.g., the question and the generated answer for Answer Relevance).
# load the packages
from deepeval.metrics import AnswerRelevancyMetric
from deepeval.test_case import LLMTestCase

# 1.) Use a lightweight LLM-as-a-judge for the metric
metric = AnswerRelevancyMetric(model="gpt-4o-mini")

# 2.) Provide the required inputs for Answer Relevancy: the user question and the generated answer
test_case = LLMTestCase(
    input="Which new medications are available for the treatment of psychosis and how do they work?",
    actual_output=(
        "Based on the information provided, there are two promising new medications "
        "for the treatment of psychosis: ...")
)

# 3.) Run the metric on the test case → returns a continuous score in [0, 1]
metric.measure(test_case)
print(metric.score)
The two other triad metrics work analogously, but each expects slightly different input fields according to the relationships shown in the diagram.
Custom Metrics
Generic metrics are great for a quick start. But domain-specific systems often need task-specific checks. DeepEval’s GEval lets you define a metric by describing it in natural language (criteria or step-by-step rubric), and then uses an LLM judge to score it.
For example, let’s say you build a RAG bot for legal text summarization. You might want a metric that checks whether the summary preserves legal meaning, avoids distortions, and doesn’t hallucinate new legal claims. You can define your custom metric with steps like this:
# load the packages
from deepeval.metrics import GEval
from deepeval.test_case import LLMTestCase, LLMTestCaseParams

# 1.) Define a custom GEval metric for legal summarization correctness
summarization_correctness_metric = GEval(
    name="Summarization_Correctness",
    # define the evaluation criteria
    evaluation_steps=[
        "Check whether the essential legal content is correctly represented.",
        "Verify that no additional information has been invented.",
        "Ensure that the summary does not distort the meaning or legal significance.",
        "Make sure the language is clear and understandable for legal laypersons."
    ],
    # define the input parameters
    evaluation_params=[LLMTestCaseParams.ACTUAL_OUTPUT, LLMTestCaseParams.INPUT],
)

# 2.) Create the test case: a full legal text (input) and its generated summary (actual_output)
llm_test_case = LLMTestCase(
    input=FULL_TEXT,
    actual_output=SUMMARY,
)

# 3.) Run the metric → returns a score in [0, 1] for summarization correctness
summarization_correctness_metric.measure(llm_test_case)
print(summarization_correctness_metric.score)
Another example: suppose your RAG bot answers science questions, but the target-group are school children, so you need answers that are suited for children and young teenagers. Moreover, you want to have a more direct binary check instead of a continuous score, i.e., a metric that simply returns 0 (for a bad answer) or 1 (for a good answer). You can define this simply by setting `strict_mode=True`:
# load the packages
from deepeval.metrics import GEval
from deepeval.test_case import LLMTestCase, LLMTestCaseParams

# 1.) Define a custom GEval metric to check if an answer is understandable for school students
student_comprehensibility = GEval(
    name="Student_Comprehensibility",
    evaluation_steps=[
        "Assess whether simple, age-appropriate language is used (short sentences, active voice).",
        "Identify technical terms/jargon and check whether they are avoided or briefly explained.",
        "Check for a clear structure (1–3 key points, optionally a short example).",
        "Verify that no unnecessary details reduce comprehensibility."
    ],
    evaluation_params=[LLMTestCaseParams.ACTUAL_OUTPUT, LLMTestCaseParams.INPUT],
    strict_mode=True,  # binary output: 0 (fails) or 1 (passes)
)

# 2.) Create the test case: a user question (input) and its generated answer (actual_output)
llm_test_case = LLMTestCase(
    input=INPUT_QUESTION,
    actual_output=OUTPUT_ANSWER,
)

# 3.) Run the metric → returns 0 or 1 depending on whether the answer meets the rubric
student_comprehensibility.measure(llm_test_case)
print(student_comprehensibility.score)
Sometimes a simple deterministic approach is enough. If you require short answers, a simple Python function can do the job without an LLM judge:
# load the package
from deepeval.test_case import LLMTestCase

# 1.) Define a simple deterministic metric that checks if the generated answer is below a maximum length (here, 500 characters)
def length_metric(test_case: LLMTestCase, max_len=500):
    # Return 1 if answer length is within limit, else 0
    return 1 if len(test_case.actual_output) <= max_len else 0

# 2.) Create the test case
llm_test_case = LLMTestCase(
    input=INPUT_QUESTION,
    actual_output=OUTPUT_ANSWER,
)

# 3.) Run the metric → returns 1 if answer is short enough, 0 otherwise
print(length_metric(llm_test_case))  # 1 = passes, 0 = fails
Deterministic checks are fast, cheap, and reproducible, and they pair nicely with LLM-as-a-judge metrics.
Final recap:
- We defined the use case of our RAG bot.
- We indexed our knowledge base and created a searchable vector store.
- We generated a synthetic QA test set and filtered it for quality and diversity.
- We defined metrics to evaluate our system.
In the next post, we’ll apply the RAG triad to a naïve baseline and an extended pipeline, compare scores, and iterate. This gives us a simple, defensible way to decide whether a change actually helps.